Meet bbPress: installing and configuring
Aveamnevoie de un forum bun care sa se integreze cat mai bine cu WordPress. Dupa cateva ore de analiza m-am oprit la bbPress. Mai lucrasem cu bbPress acum 2-3 ani dar pe atunci stiu ca era destul de complicat sa fac legatura cu WordPress, asa ca am fost putin circumspect dar mi-am luat inima in dinti si am downloadat bbPress 1.0.3 sperand ca de data aceasta sa fie mai usor.
Am aruncat o privire asupra instructiunilor de instalare de pe site-ul bbPress si mi s-au parut pasi logici. Am urcat fisierele pe server si apoi a inceput distractia.
La fel ca la WordPress, in directorul radacina exista un fisier de configurare, numit de aceasta data bb-config-sample.php. Am editat acest fisier cu datale de conectare la baza de date si l-am redenumit bb-config.php. Am accesat adresa hhtp unde am instalat bbPress si am parcurs cei 3 pasi de instalare:
- Step 1 – Configurarea bazei de date
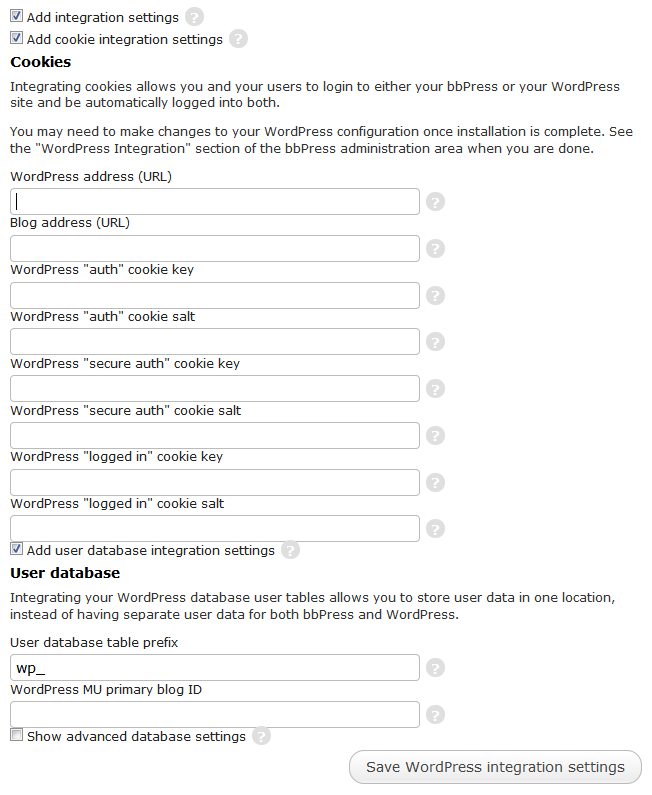
- Step 2 – Integrarea cu WordPress (optional)
- Step 3 – Site settings
Pasul 1 a fost realizat prin editarea bb-config.php, asa ca cel mai important mi s-a parut pasul 2.
1
Deactivate WordPress 3.1 admin bar
 I like WordPress 3.1 with it’s nice admin bar as it’s always there and helps you to get where you want much faster then before. Anyway, sometimes I fill that I don’t want to see it there anymore especially when I am working on a new theme and I want to deactivate the WordPress admin bar. So here is how I did it: inside functions.php I added this code:
add_filter( 'show_admin_bar', '__return_false' );
This was it! My WordPress 3.1 admin bar disappear.
Adding reCaptcha to ZenCart Contact us form

If you got too many spam messages from your ZenCart Contact us page and you ould like to add reCaptcha script, here you will find the steps you have to do to make it work.
First of all you have to copy the ‘recaptchalib.php’ file to server wherever you like inside www/includes folder but remember this location. I’ve uploaded it to
www/includes/modules/pages/contuct_us
and if you trust me, copy it at the same location to ease the later usage.
Then go open and edit this file :
includes\modules\pages\contact_us\header_php.php
Find this line:
if (isset($_GET['action']) && ($_GET['action'] == 'send')) {
Right under it add this code:
require_once('recaptchalib.php'); $privatekey = "PRIVATE_KEY_HERE"; $resp = recaptcha_check_answer ($privatekey, $_SERVER["REMOTE_ADDR"], $_POST["recaptcha_challenge_field"], $_POST["recaptcha_response_field"]); if ( !$resp->is_valid) { $error = true; $messageStack->add('contact', "Wrong reCaptcha words. Please retry !"); }This is the code received from reCaptcha, changed to work with ZenCart. When user enters the wrong words they will receive an error message that you can customize as you want.
The next step is to find the line containing this code:
if ($zc_validate_email and !empty($enquiry) ) {and add this code at the end:
and $resp->is_validresulting this final line:
if ($zc_validate_email and !empty($enquiry) and !empty($name) and $resp->is_valid) {Save and close this file as we are done with it.
Next we will handle the template file
includes\templates\{YOUR_TEMPLATE}\templates\tpl_contact_us_default.phpHere we have to add the folowing code before the closing of fieldset tag: ‘</fieldset>’
<?php require_once('includes/modules/pages/contact_us/recaptchalib.php'); $publickey = "PUBLIC_KEY_HERE"; echo recaptcha_get_html($publickey); ?>Of course that PRIVATE_KEY_HERE and PUBLIC_KEY_HERE will be replaced by the keys delivered by reCaptcha for your domain.
Save it and from this moment your Zencart Contact page will be protected by reCaptcha.